Creating Filtered Noise Stimuli
This Psykinematix tutorial shows how to create lowpass and bandpass filtered 2D noise stimuli and combine them through masking using the expression evaluation capabilities of the "Custom Stimulus" panel.
"Custom Stimulus" Panel
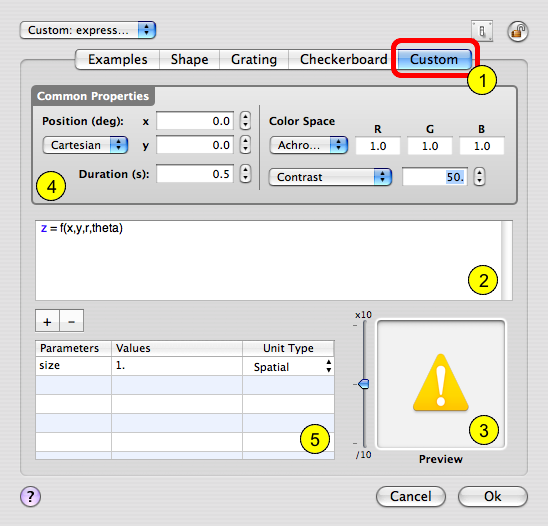
First, create a "Visual Stimulus" event in the "Designer" panel. Select this event and click the properties button (or Apple-i). The above panel will open. Click the "Custom" tab to select the "Custom Stimulus" type (1). From there, you can enter mathematical expressions in the text field (2). If correctly evaluated, a stimulus preview is displayed in (3). The chromatic appearance of the stimulus is defined by the settings in box (4).
The expressions can also contain parameters entered in table (5), these parameters can be associated to either dependent or independent variables of your experimental design. A size parameter is always predefined, so one can specify the width and height of the resulting 2D square array in degree unit.
Mathematical Expressions
The description of custom stimuli may consist in one-line expressions like 'z = f(x,y,r,theta)' where z is the output in the [-1,1] range, (x, y) the cartesian coodinates and (r, theta) the polar coordinates. x, y, r, theta are built-in 2D parameters that specify the coordinates of each pixel. The stimulus description may also consist in multiple expressions split on several lines or separated by a semicolon.
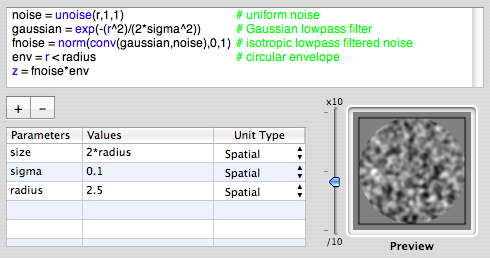
Uniform 2D Noise
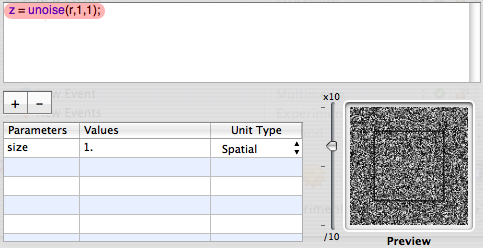
First, let's create some 2D uniform white noise stimulus using the function unoise(array size,seed,granularity) where array size can be specified by either the x, y, r or theta coordinates arrays, seed is an integer specifying the seed to be used in the random generation (this way you can create correlated noise when using the same seed), and granularity is the size in pixels of a single dot.
Note that the 2D uniform noise has an amplitude in the [-1,1] range, and that the squared black frame in the stimulus preview shows the stimulus boundary defined by the size parameter.
Gaussian Filter

Now let's create the 2D Gaussian stimulus we are going to use to filter the noise:
1) add a sigma parameter in the table, set its value to 0.1 and its unit type to spatial (ie. 0.1 deg). Change the size value to 5 deg.
2) add the expression for the Gaussian filter and assign it to the output variable z.
Note that we have renamed the noise component to an intermediary variable 'noise' but not used it yet, and added comments after the symbol # (shown in green).
Isotropic Lowpass-Filtered Noise
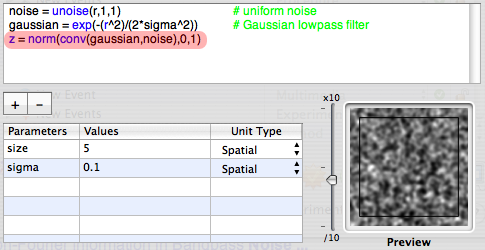
Now that we have created the noise stimulus and the lowpass filter we like to apply on it, let's convolve the two using the conv(f,g) function. Because the output has to be restrained to the [-1,1] range and the applied filter may not be normalized in term of energy, a normalization is required to preserve the contrast of the filtered signal. This is done through the norm(signal, mean, amplitude) function that rescales the signal with the specified mean and maximum amplitude.
Note that the convolution function is performed using a highly optimized fast Fourier transform (FFT) algorithm.
Circular Envelope
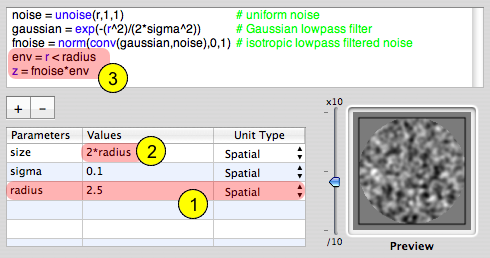
Finally, for proper stimulus presentation, one needs to limit the extend of the stimulus to a circular window. For convenience, let's add a radius parameter related to the size parameter:
1) set the radius value to 2.5 deg (don't forget to set the unit type to Spatial);
2) change the value of the size parameter to twice the radius (yes, we can also use any expression there!), this way the size will scale automatically whenever the radius parameter changes.
Now to create the expression for the circular envelope as an hard-edge window (3), one simply needs to select all pixels of the filtered noise whose radial position r is less than the window radius, that is r < radius.
Tip: Psykinematix understands the following comparison and logical operators: < , > , ≤ , ≥ , ≈ , ≠ , & , |.
It's never been easier to create complex 2D stimuli !!!
We have created isotropic lowpass filtered 2D white noise in just 5 lines ! Contrarily to a Matlab solution, there is no code overhead, and Psykinematix' expression evaluation is highly optimized for the PowerPC and Intel processors running Mac OS X.
Not complex enough ???
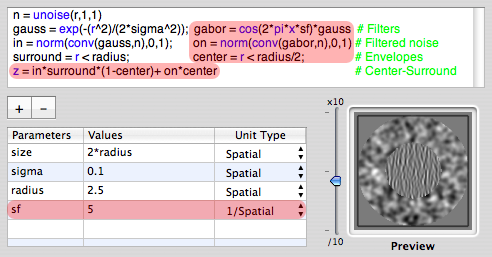
Adding a central circular area with bandpass-filtered oriented noise is not much more difficult, it basically follows the same technique:
- create a bandpass filter: gabor (note the addition of a spatial frequency parameter sf in the table),
- convolve the initial noise with this oriented filter: on ,
- create a mask for the central circular area: center ,
- finally combine center and surround so the isotropic lowpass noise gets removed from the center (see the '1-center ' term) and replaced by the bandpass orientation noise !
Hey, still 5 lines ;-)
Adding some polishing...

The center-surround combination can be further improved by removing the hard edge transition between the two types of textures: this can be done by applying a small radial Gaussian modulation (of extent sigma) at the boundary of the center envelope (see variable c) to smooth the transition between the high and low frequency noise textures.
To perform this operation, one computes the distance to the inner boundary for each pixel outside of it, on which is applied the Gaussian modulation: rect(r-radius/2) returns this distance if r ≥ radius/2, 0 otherwise.
See the difference ?
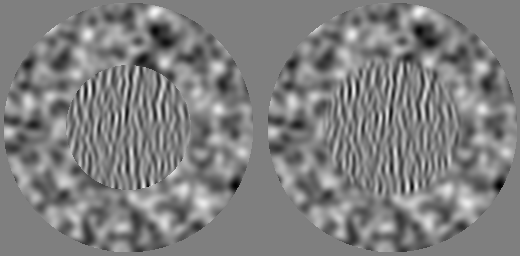
Control-click on the preview to export it to an image file or to copy/paste it into a document !
Conclusion
This stimulus can be easily integrated in any lessons of the Orientation Discrimination Tutorial !
We hope you enjoyed this tutorial ! If you have any idea for another tutorial, let us know !!!