
Hierarchical Structure of Experiments
Checking the Events
Protecting the Events
Managing the Events
Using the Wizard to Design your Experiment
Experiment Log Drawer
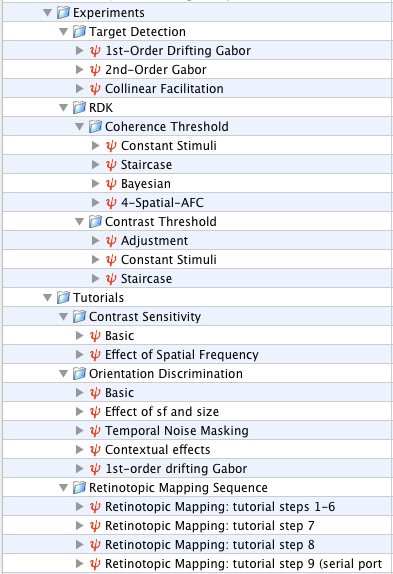
Demos, Examples & Tutorials
Psykinematix experiments are created in the "Experiment Designer" panel. This panel can be accessed at any time by clicking on the 'Designer' icon in the toolbar.
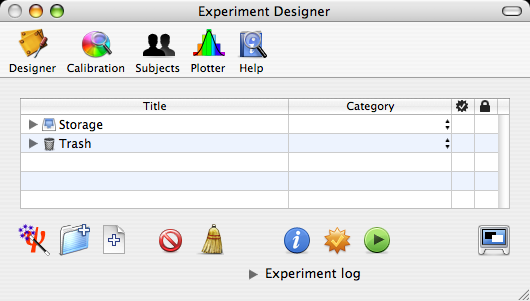
When Psykinematix first launches, the table in the panel contains only 2 items:
-
Storage which contains temporary as well as pasted items from the clipboard and imported experiments, and serves as a general depository. It also contains examples of stimuli, experiments and tutorials.
-
Trash which contains items removed from the table using the Delete button (or ⌘D). The deleted items are still available until the trash is permanently emptied with the Empty button.
Hierarchical Structure of Experiments: A Tree
In the Designer panel each experiment is represented by a tree-like hierarchical structure, composed of node and leaf events. This structure is represented in the panel by a table that uses a row-and-column format to display the hierarchical data which can be expanded and collapsed, similarly to a file system comprised of directories (nodes) and files (leaves). In this table, each row corresponds to either a single event (leaf) or a group of events (node) that can be expanded and collapsed by the user. Each column contains some basic properties of the events such as their title and category, which can be edited by the user. In this hierarchical representation, the order of the children events inside a node is important since it represents the execution or display order of these events at run-time.
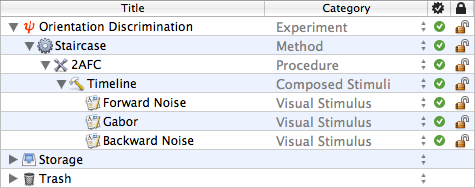
The event category is indicated by both the icon preceding its name and the category column. Several types of implementation are available for each category (the choice is made through a tab selection in the category properties panel opened with the Inspect button or ⌘I). The available categories are:
Categories |
Function |
Types |
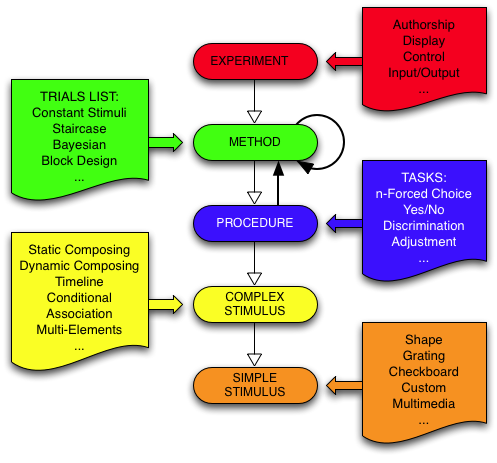
 Experiment Experiment |
This category defines an experiment entity. All aspects presented in its Properties Panel have to be specified. | Authorship Display Control Input/Output |
 Method Method |
This category specifies the stimuli parameters for each trial. | Method of Constant Stimuli Staircase Method Bayesian Method Trial Conditions |
 Procedure Procedure |
This category describes the experimental trial. It also collects the subject's responses and sets the trial results. | n-Forced Choice (nAFC or nIFC) Yes/No Discrimination Adjustment |
 Composed Stimuli Composed Stimuli |
This category specifies how simple stimuli combine spatially or temporally to form more complex stimuli. |
Static Dynamic Timeline Conditional Association |
 Multi-Elements Multi-Elements |
This category allows a large number of similar simple stimuli to form more complex stimuli. | Random-dot Kinematogram (RDK) Multi-Element Field (MEF) Sampled-Shape Stimulus (SSS) |
 Visual Stimuli Visual Stimuli |
This category creates simple or complex built-in stimuli. | Shape Stimuli |
 Multimedia Multimedia |
This category imports multimedia stimuli created outside Psykinematix. | Text Image Movie Sound |
The whole structure of an event node can be displayed by pressing the 'Option' key when clicking on the expansion arrow. Pressing the space bar will expand/collapse the first level of the selection. Any event can be moved with drag & drop operations, copy/pasted with ⌘C/⌘V (into Storage), as well as dragged and copied while pressing the 'Option' key. Events can be imported or exported using "Import" and "Export" in the File menu.
When designing a new experiment, you do not necessarily have to start thinking in terms of a tree representation but following the Psykinematix experimental paradigm (Method/Procedure/Stimulus) would be the most beneficial approach. You can begin with the creation of either the protocol or stimuli, then start adding and removing node and leaf events until the experiment description is achieved.
However, it is important to be aware that there are some constraints in the way a valid experiment can be described as a tree representation: for example, the top node should always be in the "Experiment" category with children events being in the "Method", "Procedure" or "Composed Stimuli" categories, themselves with children events corresponding to the "Stimuli" category. The stimuli creation should also be described according to a hierarchical structure such as a timeline composed of simple and more complex stimuli events. Conversely, a node in the "Composed Stimuli" category should not have children in the "Method" category.
In short, the experiment design should follow some grammatical rules. As these may change in future versions of Psykinematix (to allow for more flexible and complex experiments), it is important to make sure your experiments are correctly constructed according to the rules used by your version of Psykinematix. For this reason, the "Designer" panel provides a button that checks the validity of the experiments.
To automatically perform this check on every selected event, there is an 'auto-checking' check box in Report Preferences.
The status of each event is indicated in the ![]() column:
column:
= a valid event
= an invalid event because one or several of its children are not supported
= a valid event but not supported by its parent (source of the invalid event above)
= a valid event with some invalid progeny
= unchecked event
The rules for the hierarchical structure are summarized in the following table which specifies whether a given category can be used as a parent or child node from another category:
| Children\Parents | Experiment |
Method |
Procedure |
Composed Stimuli |
Multi-Elements |
| Experiment | |||||
| Method |
| ||||
| Procedure | |||||
| Composed Stimuli | |||||
| Multi-Elements | |||||
| Visual Stimuli | |||||
| Multimedia |
Notes:
1: "Trial Conditions" method can only embed other methods (ie: not itself) and stimuli;
2: "Timeline" composed stimuli cannot embed other Timeline, Conditional or Association composed stimuli;
3: "Dynamically" composed stimuli can only embed "Statically" composed, multi-elements, visual and multimedia (Image & Text) stimuli;
4: "Multi-Elements" stimuli can only be embedded in Dynamic, Timeline, Conditional or Association composed stimuli;
5: Only "Image" and "Text" multimedia stimuli can be embedded in Dynamically composed stimuli;
The last column in the designer table provides a lock for each event. This locking status protects against unwanted modifications in the experimental design or in the event properties. A locked event:
cannot be deleted,
cannot be moved from its parent event,
can have its properties inspected but not modified,
automatically locks its children events,
can have its children deleted if these have been manually unlocked.

The locking button in the properties panel can be changed to:
-
unlock momentarily the properties to modify them: a password is required to perform this operation if one is set in the Admin Preferences. However once the changes have been validated and the properties panel been closed, the event retains its locked status.
lock the properties.
To permanently unlock an event, its lock status has to be changed from the designer table. A password is also required to perform this permanent unlocking if one is set in the Admin Preferences.
Psykinematix offers a very user-friendly way to create your psychophysical experiments, as well as add and remove, customize, validate, and run events. This is done using the tools available in the toolbar at the bottom of the Designer panel:

Tool
|
Function |
Description |
Create an experiment (⌘W) |
This adds a new experiment with a predefined hierarchical structure based on the Wizard configuration. | |
Add a group event |
This adds a group event as a child of the currently selected event (or to the top level of the table if none is selected; press ⌘ and click to deselect the current selection). This added event corresponds to a node in the tree structure, and should contain either leaf or node events. |
|
Add a single event |
This adds a single event as a child of the currently selected group event (or to the top level of the table if none is selected; press ⌘ and click to deselect the current selection). This added event corresponds to a leaf in the tree structure, and cannot contain any other event. |
|
Delete selected events (⌘D) |
This deletes currently selected events from the tree structure. If confirmed, these deleted events are moved into the Trash node depicted by the icon |
|
Empty Trash |
This empties the Trash node containing deleted events (see above). Before emptying, an alert asking for confirmation is displayed. If confirmed, all events contained in the Trash are deleted and cannot be recovered. |
|
Inspect event properties |
This displays the properties of the currently selected event (only one at a time) using a sliding sheet. This sheet presents the editable properties of the selected event. Note that the Designer panel is unavailable until the sheet is closed. |
|
Check event's validity |
This checks the structural validity of the selected events. The status of each related event (parent or child) will be updated with a mark indicating whether or not a problem has occurred (see |
|
Run event (⌘R) |
This runs an experimental session based on the selected event. This event has to be in the 'Experiment' category. |
|
Toggle between full screen and window mode |
This indicates whether the experimental session or calibration procedure are run in full screen or window mode (the latter should only be used for testing purpose as no session result is saved in the results database). |
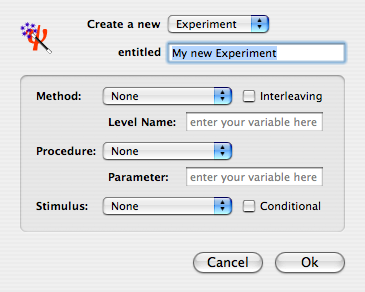
Using the Wizard to Design your Experiment
The Wizard provides an easy way to create new experiments by simplifying the design process since it follows the Psykinematix experimental paradigm (Method/Procedure/Stimulus): the experimenter simply indicates the method, procedure and stimulus types to be used, and the corresponding hierarchical structure is automatically created in the design window. Nonetheless it is important to carefully customize and review each event created in the hierarchical structure. The hierarchical structure of the experiments is described above.
To create a new experiment using the Wizard:
- Click on the magic wand icon in the bottom toolbar (or press ⌘W).
- Provide a name for your experiment.
- Select the desired method, procedure and stimulus.
- Indicate whether to interleave the method and select the stimulus based on some conditions.
- Click on the "OK" button to generate the hierarchical structure. The new experiment will then be added at the top of the Design Panel.
If you intend on re-using the same experimental structure in various experiments, we recommend you copy the experiment into the storage area and rename it by adding "Template" to its title. This way, experiments with a similar structure can easily be created by copy/pasting this template back into the main level of the designer window.
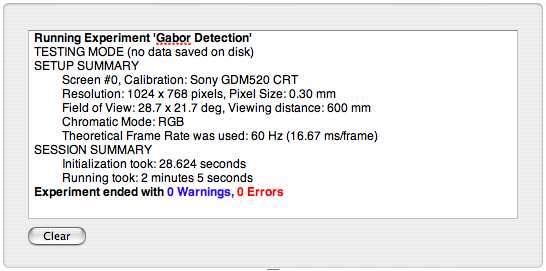
Once the session has completed or after it has been aborted, additional information is available in the Experiment log window revealed by clicking on the "Experiment log" button at the bottom of the Designer panel (this window can appear either as a drawer attached to the Designer panel or as an independent window, see the option available in the Admin Preferences to switch between these 2 modes). In additional of the setup summary, the log window presents the error (in red) and warning (in blue) messages that may have occurred during the session. Explanation for the error and warning messages can be found in the Troubleshooting section.
The storage area contains up-to-date versions of examples of stimuli, techniques, and experiments. The tutorial experiments can be found there as well. To run any of these examples, select the corresponding experiment event (the one with the leading ![]() icon) and click on the Run button
icon) and click on the Run button ![]() (or press Apple-R).
(or press Apple-R).
It is recommended to make copies of these tasks rather than modifying them directly (use Apple-D to duplicate the selected experiment to the top level of designer table). If modified, the original examples can nevertheless be imported back into the storage area using the "File/Import/Experiments/from Internet" menu.
The examples of stimuli and techniques demonstrate how to create simple (grating, checkerboard, shape) and complex (spatial and temporal composing) visual stimuli using Psykinematix capabilities.
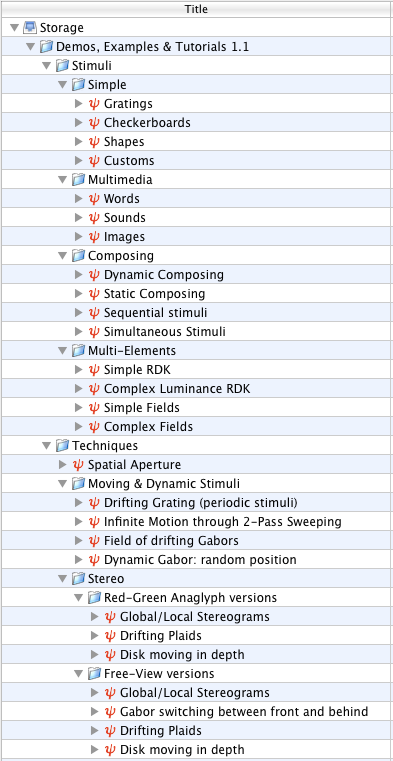
The examples of experiments and tutorials demonstrate complete psychophysical experiments.